
THIS POST INCLUDES:
1. Creating Ecourses
2. Choose Your Course Topic
3. Create Your Course Outline
4. Create Your Course Content
5. Edit Your Course
6. Publish Your Course
7. Free Download Ecourse Sales Page Cheatsheet
CREATING ECOURSES
Ecourses come in a variety of formats. You can have short and simple versions that are run through a series of emails, or you can have more complex and in-depth ecourses that are delivered through an online teaching platform over many months or even a year. There are many more formats in addition to these examples.
How your ecourse is structured will depend on your overall goals for your ecourse. Your ecourse structure will also depend on your budget and available time resources. If you are running your ecourse in addition to your private practice then you may only have limited hours to commit to delivering an ecourse.
The ecourse structure you choose will dictate how much time you spend on creating your ecourse content. In this blog post, we’re providing an example of how to complete an ecourse in 30 days. This is based on spending about 1-3 hours a day on creating core course content. Some days in the 30 day plan will take longer as you begin to create the actual content. Other days in the 30 day timeframe will be shorter as you work on much simpler tasks such as outlines, editing, and uploading.
Creating an ecourse does take a commitment of time, so if the idea of spending 1-3 hrs a day on ecourse creating sounds a lot to you, then you can decide to reduce the time spent and therefore deliver a much shorter ecourse. Alternatively you can take the approach that this is an out of the ordinary event that you’re prepared to invest the time in for the long term gains.
Although this plan is to create an ecourse in 30 days, you do not need to do the 30 days consecutively. You can choose to work only during the week or on weekends. You can choose to spread your 30 day process over as much time as you need. It’s useful to set yourself a deadline so that you keep working on your ecourse through to completion.
The time you need to spend on your ecourse will depend on a variety of factors that are individual to you. Factors that affect the time you need to spend on creating an ecourse include:
- Your productivity levels
- Your ability to focus
- If you already have content created that you can repurpose for an ecourse
- If you have other people to help you
- Your familiarity with technology
If you’ve never created an ecourse before, you can assume you may feel some struggle on completing your first ecourse. As the adage goes, practice makes perfect.
For your first ecourse you may want to make it short and focused on a single topic so you can assess your ecourse building skills and abilities for future ecourses. You can also use your first ecourse as a springboard to develop further ecourses that build upon the knowledge that you provide in your first ecourse.
This blog post does not focus on marketing your ecourse. The 30 day ecourse plan in this blog post only covers:
- how to develop your ecourse idea
- creating the ecourse content
- making your ecourse available to your students.
To read more about creating an ecourse for your therapy practice, check out our previous blog post here: How Do I Create an Ecourse for my Therapy Practice.
The post includes:
1. Why create an ecourse
2. Choosing your ecourse idea
3. Create your ecourse
4. Marketing your ecourse
This blog post has good ideas on how to choose your ecourse topic, how to structure your content, and the types of content to include in your ecourse.
CHOOSE YOUR COURSE TOPIC
Days 1-2
Your first major decision will be what your ecourse topic should be about. Your ecourse idea should be a blend of providing what your potential students are looking for as well as topics that you are personally interested in and possess the skills to teach.
To help you define your topic, ask yourself these questions:
- Who is your audience
- What is the number one challenge your potential student is facing
- What is the end result that you want for your students after completing your ecourse
Below is a general guideline of how to spend each day in this section:
DAY
1. Make a plan for the next 30 days. Use this example plan in this blog post as a general guide. Book 1-3 hours in per session into your calendar. Allocate tasks to each day. Collect the resources, links, documents you will use to research your topic idea.
2. Review the resources, links, documents that you collected on day 1 to research your topic idea. Allow approximately 60 minutes to peruse each resource to try and determine the main ideas that you wish to include in your ecourse. Use the next 60 minutes refining this list of main ideas to determine your main course idea.
CREATE YOUR COURSE OUTLINE
Days 3-5
Spending time on developing your course outline now will provide you with a framework for you to create your course content. This will help you stay focused on your course topic and reduce the prospect of getting distracted by pursuing other facets outside of the scope of your course.
When you are in the process of creating content, it can sometimes be tempting to keep adding more and more content that is complementary to your main topic. While this may appear to be helpful for your client it can also be unhelpful for two reasons:
It is distracting you from completing your course in a reasonable timeframe so that you can make your course available to your students
Too much information can be overwhelming to your potential students. Your goal to help your students should focus on providing concise and simple content.
Below is a general guideline of how to spend each day in this section:
DAY
3. Make decisions on:
- ecourse delivery method (eg. Email, on your website, using a 3rd party platform, download pdf etc)
- length of the course
- price of the course
- Payment methods (credit card, PayPal etc.) Decide whether you will require payment in full at purchase or whether you have payment plans available. One off payments and/or payment plans. Create your refund policy.
All of these items can be changed or refined later if your ecourse changes direction. It is important to make decisions and keep momentum on creating your ecourse.
4. Research topic content from sources: Facebook groups, Amazon books, other ecourses, Google, podcasts. Brain dump all potential ideas, however, ensure they remain relevant to your main topic and goal for your students.
5. Use the research information that you gathered on day 4 to work out your course outline and how you will structure your course content. The most common method involves creating modules or lessons. You can choose to create each module as one single lesson, or you could choose to create sub-units within each module.
An example of a course outline has been taking from a previous blog post: How Do I Create an Ecourse for my Therapy Practice
An example of how you could structure your content is listed below:
NOTE: Assume your ecourse has 4 modules and 4 sub-units within each module.
MODULE 1
- Unit 1 – 500 words
- Unit 2 – 500 words
- Unit 3 – 500 words
- Unit 4 – 500 words
- Module handout
MODULE 2
- Unit 1 – 500 words
- Unit 2 – 500 words
- Unit 3 – 500 words
- Unit 4 – 500 words
- Module handout
MODULE 3
- Unit 1 – 500 words
- Unit 2 – 500 words
- Unit 3 – 500 words
- Unit 4 – 500 words
- Module handout
MODULE 4
- Unit 1 – 500 words
- Unit 2 – 500 words
- Unit 3 – 500 words
- Unit 4 – 500 words
- Module handout
This guideline would be an initial plan to get you started on your planning process. The guideline also ensures you stay on track with creating succinct and relevant information in your ecourse.
As you create each module you may find situations where you need to provide additional resources such as images, audio, or video files.
In summary, the above course module would mean you need to create 8000 words of content over 4 main topics and 16 sub-units. Not all modules may have the same number of sub-units and resources.
Your guideline should be useful enough to help get your started but remain flexible as you create your actual content. By creating this initial plan outline, you now have a guideline as to the amount of content that you are creating and can then decide how to plan your time to spend on creating ecourse content.
CREATE YOUR COURSE CONTENT
Days 6-21
The process of creating your course content should easily flow based on the amount of work you put into creating your course outline and timetable. It is important at this stage of your ecourse creation process to gain momentum.
In this stage you should create your content without spending too much time on editing. Write, record, create as much content as you can in each session. Don’t worry about grammar, spelling or anything that will slow you down from creating content.
Once you have decided on your ecourse structure (from the previous section) and the types of content you will include in your ecourse, it’s time to start creating your documents, videos, audio, and visual aids as required.
Below is a general guideline of how to spend each day in this section:
DAY
6. Course Creation Module 1
7. Course Creation Module 1
8. Course Creation Module 1
9. Course Creation Module 2
10. Course Creation Module 2
11. Course Creation Module 2
12. Course Creation Module 3
13. Course Creation Module 3
14. Course Creation Module 3
15. Course Creation Module 4
16. Course Creation Module 4
17. Course Creation Module 4
18. Create image and file resources for students to download
19. Create image and file resources for students to download
20. Create image and file resources for students to download
21. Create image and file resources for students to download
EDIT YOUR COURSE
Days 22-25
Editing your course should focus on 3 important tasks:
- Correcting any grammar or spelling errors
- Ensuring your content flows in a natural order
- Ensuring your content achieves the overall goal that you initially set to help your student.
If any content does not achieve your overall goal, you should remove it and maybe use it in another course at a later date.
Think about your limits on time. Would you rather read a book that is 1000 pages long or a book that is 200 pages long and provides the same message? More is not always better.
Below is a general guideline of how to spend each day in this section:
DAY
22. Edit course content
23. Edit course content
24. Edit course content
25. Edit course content
PUBLISH YOUR COURSE
Days 26-30
Just when you think all of the hard work is done in creating your course content, you now have to make your course available to new students. If you’ve never sold an online course before, it’s easy to become overwhelmed at the many options available for delivering content to your potential students.
Your choice of platform will depend on the time you have available as well as your budget. There are many options available which we’ve listed below:
ONLINE COURSE DELIVERY PLATFORMS
- Course Cats
- CourseCraft
- CreativeLive
- Ejunkie
- Gumroad
- Kajabi
- Lynda
- Member Mouse
- Teachable
- Teachery
- Thinkific
- Udemy
- Wishlist Member
- WP Courseware
- Zippy Courses
You can also choose to deliver your ecourse via email. Each email would contain a separate module or lesson. It’s important to remember that email does have size limits on attachments so you may not be able to attach video, audio, or large documents. You can upload these resources to your website and then provide links in each email.
You can also choose to deliver your ecourse via a document such as a pdf or Word based document. You can also include links to external resources, such as video and audio in your document.
Below is a general guideline of how to spend each day in this section:
DAY
26. Load your content to your ecourse platform
27. Load your content to your ecourse platform
28. Check that all modules contain the correct videos, audio, pdfs, content etc
29. Work through the course as a student and correct any issues.
30. Work through the course as a student and correct any issues.
CELEBRATE – YOU’RE FINISHED!
LEARN MORE ABOUT CREATING AN ECOURSE
To help you complete your ecourse, you may want to read previous blog posts we’ve created that will help you with the creation, planning, productivity, and marketing aspects of creating your ecourse.
Check out the links below to previous blog posts:
COURSE CREATION:
MARKETING:
- 5 Essential Marketing Templates for your Therapy Practice
- How to Build an Email List for your Therapy Practice
- How to Create a Free Offer to Build Your Email List
- The Best Marketing Methods for Art Therapists
PLANNING:
- 10 Useful Planning Tools for Your Business
- How to Plan A Productive Year as a Therapist
- How to Plan Your Marketing Strategies
- Planning Template for Your Art Therapy Practice
- Review of Scrivener for Content Writing as a Therapist
PRODUCTIVITY:
- BOOK REVIEW Smarter Faster Better: The Transformative Power of Real Productivity
- BOOK REVIEW The Power of Habit: Why We Do What We Do in Life and Business
Need help with creating your ecourse?
If you need help to create your ecourse, we provide an Ecourse Planner Package in the store. You can purchase the package in a variety of different formats including:

The course planner package provides a roadmap on how to get your course completed from choosing your course topic to creating course content and then launching your course with a strong marketing strategy in place.
If you’re ready to create your next course or workshop then this package is perfect for you.
Creating an online course, or in person workshop could be exactly what your therapy business needs to help bring more exposure to your business. Courses and workshops are also an excellent way to create alternative income for your art therapy business.
Maybe you’ve considered creating a course before but abandoned the idea because it seemed too much work for an uncertain outcome.
Creating a course can be daunting from designing your course structure, to creating your course content, and then finally putting into place the most effective marketing techniques to sell your course.
This course planner package provides a roadmap on how to get your course completed from the first step of coming up with your course topic, all the way through to creating course content and then finally launching your course.
The course planner package does not contain generalised information about courses but instead provides nitty gritty detail on how to execute the necessary steps to get your course completed.
The package includes 4 major sections:
- Course Admin – the course admin section will help you to establish the administrative foundation that will help support your course creation process. Setting up the basic admin structure you need will help boost your productivity and efficiency in getting your course completed.
- Course Design – this section will help provide you with the core decisions that have to be made about your course topic, format, and delivery method. Included is the essential components of creating your course modules.
- Marketing – once your course is completed, you will need to implement an effective strategy to market your course. This section contains specific details about the marketing assets you will need and the sales channels you should market.
- Worksheets – here’s where you get to work! These worksheets provide all you need to complete your course fast!
Using the resources in this package makes the process of creating your course so much easier.
This package will save hours of wasted time trying to understand what you need to organise, create and market your course for your therapy business.
If you’ve always wanted to create a course but struggled to find a place to start, this package will provide you with a clear direction to get your course completed.
The package is full of actionable worksheets to help get your course done!
After working through this package you will:
- Have a step by step project plan to create your next course
- Centralise all of your course assets for easy updating
- Select tech gear to create your course and 3rd party platforms to host your course
- Create an effective customer sales funnel to sell your course
- Construct your sales emails using our email outlines
- Decide on your course topic, form and method
- Create your course using the module template
- Create the necessary marketing assets you will need for your course
- Devise a blogging strategy to help market your course
- Use the 30 day planner to complete your course
——————————————————————————————————————–
The contents of this package include the following sections:
COURSE ADMIN
- Master Checklist
- Admin
- Tech
- Financial
- Folder Structure
- Planning
- Customer Sales Funnel
COURSE DESIGN
- Course Topic
- Course Format
- Course Delivery
- Course Creation
MARKETING
- Marketing Assets
- Blogging
- Social Media
- External
WORKSHEETS
- Worksheet List
- Master Checklist
- Important Links
- Financial
- Folder structure
- Sales funnel
- 30 Day Planner
- Course modules
- Sales page content
- Email outlines
Below is a breakdown of the individual sections within each major category in this package.
COURSE ADMIN
Master Checklist
The master checklist contains the necessary steps to complete your course. It also includes an additional checklist of things to do for an in-person workshop.
Admin
It’s important to centralise the administration of your most important documents and files used to create your course including lead magnets, sales pages, your folder structure, software, payment system access, and policy documents.
Tech
Use our comprehensive list of tech gear including administration tools as well as content creation, course delivery and marketing tools and software.
Financial
Included in this Course Planner Package is an excel spreadsheet that you can use to calculate the number of courses you need to sell to break even. You can also use the spreadsheet to record your estimated profit and your actual profit once your course has been completed.
Folder Structure
Included in the Course Planner Package is a suggested folder structure to help keep your documents organised for quick access. We’ve also included a file naming template to help you improve your information management process.
Customer Sales Funnel
A sales funnel helps you craft your marketing message to your audience. Included in the Course Planner Package are 3 different sales funnels and the steps involved in marketing your course.
Planning
Included are the basic steps to plan your course workflow, including suggested programs to use to set up your course management system.
COURSE DESIGN
Course Topic
Included in this section are the questions you need to consider before finalising your course topic. Also included is a list of online sources to help consolidate your course topic ideas.
Course Format
You can choose to deliver your course using a variety of different formats. You can also mix and match different formats. Included is some suggestions on how to structure your course format.
Course Delivery
This package will help you decide on your course delivery method including suggestions on how to host your course online.
Course Creation
Use the provided checklist to create your course content. Use the module templates as a guide on what content to include in each module. Included is 2 examples of a module structure including single lesson and multiple lessons.
MARKETING
Marketing Assets
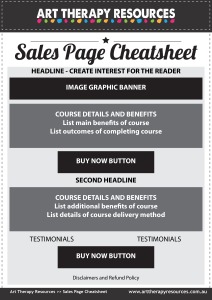
Throughout the marketing process, you will need to create many documents, files and images to create your marketing materials. Included is a list of the common items you will need to market your course. Also included is a sales page example layout and a checklist of key components that should appear on your sales page.
Blogging
Your website is a central hub to market your course and your blog is the key place to promote your course. Included are details about creating your necessary lead magnet along with a list of 20 Lead Magnets you can use for your course.
Social Media
In this package is a simplified list of the items you should be publishing on your social media platforms while launching your course. Included are important tips about creating a hashtag/tag list to help boost the visibility of your course.
Email
Included is 2 examples of how you can schedule your email content based on your course structure. Learn about the educational emails you should include in your email content, including some useful examples of specific educational emails you can write.
External
In the Course Planner Package you will find details about where to market your course externally.
WORKSHEETS
Worksheet List
This is a summary list of the worksheets available to use in your Course Planner Package.
Master Checklist
The master checklist contains the necessary steps to complete your course. It also includes an additional checklist of things to do for an in-person workshop.
Important Links
Use this template to record your important links used in your course including payment systems, course pages, social media, course management software, marketing links and more.
Financial
Use this Excel spreadsheet to calculate the number of courses you need to sell to breakeven. You can also use the spreadsheet to record your estimated profit and your actual profit once your course has been completed.
Folder Structure
Use the suggested folder structure to help keep your documents organised for quick access. Also included is a file naming template to help you improve your information management process.
Sales Funnel
Use the 3 different scenarios below to build your ideal sales funnel. You can use one of the examples below or use a combination. Your sales funnel should suit your course and your audience.
30 Day Planner
Use this 30 Day Planner to set weekly and daily to-do’s to get your course completed. Included is the 4 main goals you will need for each course you create.
Course Modules
Use the module templates as a guide on what content to include in each module, including your welcome module and final summary module.
Sales Page Content
Use the sales page layout graphic as a guide to create your sales page. Also included is a template to craft your headlines, details and benefits and overall sales page structure.
Email Outlines
Use these outlines as a guide to construct your email content for each step in your sales funnel. Includes 6 email outlines that are necessary for your course launch.
FREE DOWNLOAD: Ecourse Sales Page Cheatsheet
SIGN UP below to download the FREE Ecourse Sales Page Cheatsheet
This cheatsheet provides you with a suggested layout of an effective sales page to include on your website to sell your ecourse. This sales page cheatsheet is designed to walk your potential customer through your ecourse outline.
This sales page cheatsheet is taken from the Course Planner Package that is available in the store for purchase.
BUILD YOUR ART THERAPY REFERENCE MATERIALS:
Pin this image to your Pinterest board.

SHARE KNOWLEDGE & PASS IT ON:
If you’ve enjoyed this post, please share it on Facebook, Twitter, Pinterest. Thank you!